Step 2: Building
We will now start building our computer by connecting all the components.
- Start with the case. open the case from both side, usually 2 screws on each side and make sure the power supply is properly fixed.
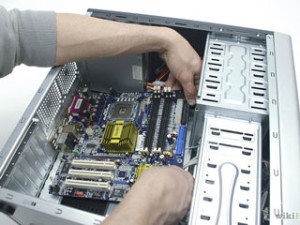 Now mount the motherboard. Every mother board is provided with a user manual with pictures which are easy to follow. There is an I/O shield which protects the ports of the motherboard. This need to be placed in the rectangular space at the back of case. Look for the holes on the board which coincides with that on the case. And screw in the stand-offs first. Now place the motherboard on top of standoffs such that all its ports are in-line with the I/o shield and screw the motherboard.
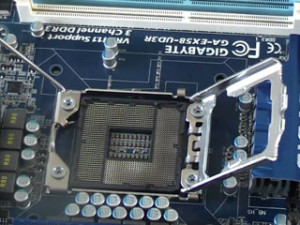 Now install the processor. Lift up the lever on the motherboard and place the processor very carefully so that it fits in the slot. Now place the heat sink/cooler on top of processor. It is better if you can place some thermal paste ( a small tube of paste ) between heat sink and the processor.
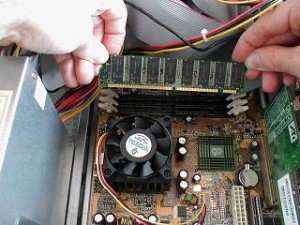 Install RAM. Install the RAM in the memory slots provided. Usually there are 2 or more memory slots. You may need to add some pressure so that the clips are secured onto your RAM.
- Install HDD/SSD. Mostly the HDD is installed on the front side of case. Checked the case manual. Install the HDD with the hep of 2 or 4 screws in the brackets provided. Connect the power cable with the power supply and the sata cable to the sata port on the motherboard.
- Install the optical drive. This is usually on top front portion and the portion of the case have a slit, which can be opened and the drive can be screwed there.
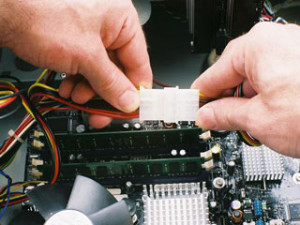 Connecting to power supply. Connect each component to power supply. The biggest pinned cable is the motherboard cable. And an another 4 pin cable. connect it too. We have already connected the HDD and optical drive power cables.
- Connect the LCD with the port provided at back. Connect the keyboard and mouse to USB ports.
- Turn it on. You will see something like press key to enter BIOS. Press that key and you will see the BIOS screen. Though Rarely, if the computer don’t start, plug off the computer and check for any loose wires. You my check the BIOS for the component installed. Each BIOS is different with other. You should change the Boot order and select the CD-ROM option as first so that we can directly boot from CD.
Step 3: Installing Operating system
Now that you have selected the CD as first boot option. Insert the CD in optical drive and you should see press any key to boot from CD. Press any key and you are ready to install operating system from CD. Follow onscreen instructions and in hardly half an hour you OS is installed.
You will have to run the CD to install drivers from the CD provided with motherboard so that sound, display , Ethernet, Bluetooth, Wifi driver are installed and these features start working. Thats it, you have successfully build your own computer. Let me know in comments how it goes.
Comments are closed.